SQLite database engine implements a small, fast, self-contained, high-reliability, full-featured, . SQLite is one the most used database engine and is a C-language library. It is built into all mobile phones and most computers.
The main package is android.database.sqlite that contains the classes to manage your own databases SQLiteDatabase mydatabase = openOrCreateDatabase("What is Database Name",MODE_PRIVATE,null);
By the steps to see the data stored in the SQLite database in the device. During developing the application we provide the pre-populated database. Also can make the database at runtime.
Some Usage Method & Description
openDatabase(String path, SQLiteDatabase.CursorFactory factory, int flags, DatabaseErrorHandler errorHandler)
In this method can opens the existing database with the appropriate flag mode.
openDatabase(String path, SQLiteDatabase.CursorFactory factory, int flags)
The method is also opens the existing database but it does not define any handler to handle the errors of databases
Armstrong Number:
A number is refer as Armstrong number if the numbers each digits cubic sum is equivalent to that number.
Example: 153 = (1)^3 + (5)^3 + (3)^3.
#include <stdio.h>
int main()
{
int number,i,j,sum,reminder,tempo,min=1,max=250;
//printf("Enter a number\n");
//scanf("%d",&number);
for(number=min;number<=max;number++)
{

tempo =number;
sum=0;

while(tempo != 0)
{
reminder = tempo%10;
sum=sum+(reminder*reminder*reminder);
tempo=tempo/10;
}
if(sum==number)
{
printf("%d is a armstrong number\n",number);
}
}
return 0;
}
C program to check a number is Armstrong number or not.
Armstrong Number:
A number is refer as Armstrong number if the numbers each digits cubic sum is equivalent to that number.
Example: 153 = (1)^3 + (5)^3 + (3)^3.
C program:
#include <stdio.h>
int main()

{

int number,i,j,sum,reminder,tempo;
printf("Enter a number\n");
scanf("%d",&number);

tempo =number;
sum=0;
while(number != 0)
{
reminder = number%10;
sum=sum+(reminder*reminder*reminder);
number=number/10;
}
if(sum==tempo)
{
printf("%d is a armstrong number\n",tempo);
}
else
{
printf("%d is not a armstrong number\n",tempo);
}
return 0;
}
Here is the few steps to solve it:
1. Go to the android to project folder
2. Then goto app -> src -> main
3. Create two directory assets then fonts into the main folder.
4. Download your custom font ,I use Roboto Font link: https://material.io/guidelines/resources/roboto-noto-fonts.html
Add this method from your activity
t1=(TextView)findViewById(R.id.text1);
Typeface roboto = Typeface.createFromAsset(getAssets(), “fonts/Roboto-Bold.ttf”);
t1.setTypeface(roboto);
Firstly you have to know either your pc already installed jdk software or not. If not then click the link https://www.oracle.com/java/technologies/javase-jdk16-downloads.html and below the “Windows x64 Installer(if operating system is 64 bit)” or “Windows x32 Installer(if operating system is 32 bit)”
System Requirements
Microsoft Windows 7/8/10 (32-bit or 64-bit)
4 GB RAM minimum, 8 GB RAM recommended (plus 1 GB for the Android Emulator)
2 GB of available disk space minimum, 4 GB recommended (500 MB for IDE plus 1.5 GB for Android SDK and emulator system image)
1280 x 800 minimum screen resolution.
Then download and install Java SE Development Kit 16(jdk).
Now it is time for Install and Set up Android Studio in Windows
Link for Android studio download: https://developer.android.com/studio/
Follow every steps with the video tutorials.
For Android app development Android Studio is the official IDE. It is based on JetBrains IntelliJ IDEA software also provides many excellent features that enlarge productivity when building Android apps, such as:
Anyone can develop for all Android devices such kind of environment.
Modify to push code and resource into the running app without restarting the app.
A flexible Gradle-based build system with fast and feature-rich emulator.
GitHub and Code template to develop common app features and import sample code.
Extensive testing tools and frameworks along support C++ and NDK.
Built-in support for Google Cloud Platform, making it easy to integrate Google Cloud Messaging and App Engine, and many more.
Installation Guideline:
Step 1: Head over to this link to get the Android Studio executable or zip file.
Step 2:Click on the Download Android Studio Button. Click on the “I have read and agree with the above terms and conditions” checkbox followed by the download button.
Click on the Save file button in the appeared prompt box and the file will start downloading.
Step 3: After the downloading has finished, open the file from downloads and run it. It will prompt of the dialog box.
Click on next. In the next prompt, it’ll ask for a path for installation. Choose a path and hit next.
Step 4: It will start the installation, and once it is completed.
Click on next.
Step 5: Once “Finish” is clicked, it will ask whether the previous settings need to be imported [ That means, if the android studio had been installed earlier], or not. It is better to choose the ‘Don’t import Settings option’. Click the OK button.
Step 6: This will start the Android Studio. Meanwhile, it will be finding the available SDK components.
Step 7: After it has found the SDK components, it will redirect to the Welcome dialog box.
Click on Next.
Choose Standard and click on Next. Now choose the theme, whether the Light theme or the Dark one this is your choice. The light one is called the IntelliJ theme whereas the dark theme is called Darcula. Choose as required.
Click on the Nextbutton.
Step 8:Now it is time to download the SDK components.
Click on Finish. Components begin to download let it complete.
The Android Studio has been successfully configured. Now it’s time to launch and build apps. Click on the Finish button to launch it.
Step 9: Click on Start a new Android Studio project to build a new app.
Application won’t run unless you update google play services.
Make sure you add the map Some requirements shown in this Tutorial https://www.youtube.com/edit?o=U&vide… Then , In order to update google play services you need to install these sdk tools 1.Android SDK Build-Tools 26 2.Google Play Services Now check either we can see map on running project? “App” wont run unless update google play services ?? Now we need to Download this file . go to browser link given on the description Step 1: Download this file PrebuiltGmsCore.apk by this address https://www.dropbox.com/s/qlavioh9s6q… Step 2: Put it in your Android SDK containing the adb.exe file. “C:\Users\%User_Account_Name%\AppData\Local\Android\Sdk\platform-tools” Step 3: Then open command prompt in this location and type the following command. Make sure you have only one emulator running. adb install -r PrebuiltGmsCore.apk go to emulator and see message ” Google Play Services updating.” Just for a while see the map ,if not again run the project also make sure in this directory ( “C:\Users\%User_Account_Name%\AppData\Local\Android\Sdk\platform-tools”) adb is running .
Navigation drawers provide access to destinations and app functionality, switching tabs. Tabs can either be permanently on-screen or controlled by a navigation menu icon. Navigation drawers are consumed for, with five or more top-level targets, two or more levels of navigation hierarchy, Fast navigation between unrelated target.
Firstly create new project like
File -> new project -> Name it as like NavigationDraweerwithTabs -> select minimum SDK like 14 ->select Navigation Drawer Activity.
package com.example.nipu.navigationwithtabs;

import android.support.v4.app.Fragment;

import android.support.v4.app.FragmentManager;

import android.support.v4.app.FragmentStatePagerAdapter;

public class tabpagerAdapter extends FragmentStatePagerAdapter {


    String[] tabarray = new String[]{"One","Two","Three","Four","Five","Six"};

    Integer tabnumber = 6;


    public tabpagerAdapter(FragmentManager fm) {

        super(fm);

    }


    @Override

    public CharSequence getPageTitle(int position) {

        return tabarray[position];

    }


    @Override

    public Fragment getItem(int position) {


        switch (position)

        {

            case 0:

                one one1 = new one();

                return one1;

            case 1:

                two two2 = new two();

                return two2;

            case 2:

                three three3 = new three();

                return three3;

            case 3:

                four four4 = new four();

                return four4;

            case 4:

                five five5 = new five();

                return five5;

            case 5:

                six six6 = new six();

                return six6;

        }


        return null;

    }


    @Override

    public int getCount() {

        return tabnumber;

    }

}
Now goto,
MainActivity.java
Initialize TabLayout, Viewpager.
Create object tabpagerAdapter and set with viewpager
Set viewpager with TabLayout.
Here is code for,
MainActivity.java
package com.example.nipu.navigationwithtabs;


import android.os.Bundle;

import android.support.design.widget.FloatingActionButton;

import android.support.design.widget.Snackbar;

import android.support.design.widget.TabLayout;

import android.support.v4.view.ViewPager;

import android.view.View;

import android.support.design.widget.NavigationView;

import android.support.v4.view.GravityCompat;

import android.support.v4.widget.DrawerLayout;

import android.support.v7.app.ActionBarDrawerToggle;

import android.support.v7.app.AppCompatActivity;

import android.support.v7.widget.Toolbar;

import android.view.Menu;

import android.view.MenuItem;


public class MainActivity extends AppCompatActivity

        implements NavigationView.OnNavigationItemSelectedListener {


    @Override

    protected void onCreate(Bundle savedInstanceState) {

        super.onCreate(savedInstanceState);

        setContentView(R.layout.activity_main);

        Toolbar toolbar = (Toolbar) findViewById(R.id.toolbar);

        setSupportActionBar(toolbar);


      TabLayout tabLayout =(TabLayout)findViewById(R.id.tabs);

        ViewPager Pager =(ViewPager)findViewById(R.id.viewpager);


        tabpagerAdapter Tabpageradapter = new tabpagerAdapter(getSupportFragmentManager());

        Pager.setAdapter(Tabpageradapter);

        tabLayout.setupWithViewPager(Pager);


        DrawerLayout drawer = (DrawerLayout) findViewById(R.id.drawer_layout);

        ActionBarDrawerToggle toggle = new ActionBarDrawerToggle(

                this, drawer, toolbar, R.string.navigation_drawer_open, R.string.navigation_drawer_close);

        drawer.setDrawerListener(toggle);

        toggle.syncState();


        NavigationView navigationView = (NavigationView) findViewById(R.id.nav_view);

        navigationView.setNavigationItemSelectedListener(this);

    }


    @Override

    public void onBackPressed() {

        DrawerLayout drawer = (DrawerLayout) findViewById(R.id.drawer_layout);

        if (drawer.isDrawerOpen(GravityCompat.START)) {

            drawer.closeDrawer(GravityCompat.START);

        } else {

            super.onBackPressed();

        }

    }


    @Override

    public boolean onCreateOptionsMenu(Menu menu) {

        // Inflate the menu; this adds items to the action bar if it is present.

        getMenuInflater().inflate(R.menu.main, menu);

        return true;

    }


    @Override

    public boolean onOptionsItemSelected(MenuItem item) {

        // Handle action bar item clicks here. The action bar will

        // automatically handle clicks on the Home/Up button, so long

        // as you specify a parent activity in AndroidManifest.xml.

        int id = item.getItemId();


        //noinspection SimplifiableIfStatement

        if (id == R.id.action_settings) {

            return true;

        }


        return super.onOptionsItemSelected(item);

    }


    @SuppressWarnings("StatementWithEmptyBody")

    @Override

    public boolean onNavigationItemSelected(MenuItem item) {

        // Handle navigation view item clicks here.

        int id = item.getItemId();


        if (id == R.id.nav_camera) {

            // Handle the camera action

        } else if (id == R.id.nav_gallery) {


        } else if (id == R.id.nav_slideshow) {


        } else if (id == R.id.nav_manage) {


        } else if (id == R.id.nav_share) {


        } else if (id == R.id.nav_send) {


        }

    DrawerLayout drawer = (DrawerLayout) findViewById(R.id.drawer_layout);

        drawer.closeDrawer(GravityCompat.START);

        return true;

    }

}
Post-order traverse need to traverse left, then right then root. Array, Linked List, Queues, Stacks, etc. are linear traversal where have only one logical way to traverse them. Though trees can be traversed in different ways. That Traversals:
1st need to create node struct where data, *left , *right declared;
2nd need to create new node function which take an item and return new node, where firstly need i) memory allocation same as datatype size. If failed to memory allocation show error or assign data into new node,if left or right child no value then put them as NULL.
3rd to add child left and right need two function both take two input one for node pointer another for left or right child assigned.
4th create create_tree() function by create_node ,add_left_child() and right_child() function. This function return root.
5th Now use post_order() recursion function, if left child not null call post_order() recursively for left node,Again if right child not null call post_order()recursively for right node, root print.
6th main() function receive root data or value will print.
In-order traversal is very commonly used on binary search trees(BST).Tt returns values from the underlying set in order, according to the comparator set up of the binary search tree. Array, Linked List, Queues, Stacks, etc. are linear traversal where have only one logical way to traverse them. Though trees can be traversed in different ways. That Traversals:
1st need to create node struct where data, *left , *right declared;
2nd need to create new node function which take an item and return new node, where firstly need i) memory allocation same as datatype size. If failed to memory allocation show error or assign data into new node, if left or right child no value then put them as NULL.
3rd to add child left and right need two function both take two input one for node pointer another for left or right child assigned.
4th create create_tree() function by create_node ,add_left_child() and right_child() function. This function return root.
5th Now use in_order() recursion function, if left child not null call in_order() recursively for left node. root print , then Again if right child not null call in_order()recursively for right node.
6th main() function receive root data or value will print.
Program:
#include <stdio.h>
typedef struct node Node;
/* A binary tree node has data, pointer to left child and a pointer to right child */
Pre-order traverse need to traverse root, then left, then right. Array, Linked List, Queues, Stacks, etc. are linear traversal where have only one logical way to traverse them. Though trees can be traversed in different ways. That Traversals:
1st need to create node struct where data, *left , *right declared;
2nd need to create new node function which take an item and return new node, where firstly need i) memory allocation same as datatype size.
If failed to memory allocation show error or assign data into new node,if left or right child no value then put them as NULL.
3rd to add child left and right need two function both take two input one for node pointer another for left or right child assigned.
4th create create_tree() function by create_node ,add_left_child() and right_child() function. This function return root.
5th Now use pre_order() recursion function, root print first, then if left child not null call pre_order() recursively for left node. Again if right child not null call pre_order()recursively for right node.
6th main() function receive root data or value will print.
C Program For Pre-order traversal in a Tree.
#include <stdio.h>
/*create a data type node */
typedef struct node Node;
struct node{
int data;
Node *left;
Node *right;
};
/*Create each node and corresponding child.Allocate memory for new node if new node empty. show error either keep item data variable,initialize left and right child into NULL then return new */
Node *create_node (int item) {
Node *new_node = (Node *) malloc(sizeof(Node));
if(new_node == NULL)
{
printf(“Error ! Could not create an tree\n”);
exit(1);
}
new_node -> data = item;
new_node -> left= NULL;
new_node ->right =NULL;
return (new_node);
}
/*add left node corresponding parent node */
void add_left_child( Node *node, Node *child ) {
node->left =child;
}
/*add right node corresponding parent node */
void add_right_child( Node *node, Node *child ) {
node->right =child;
}
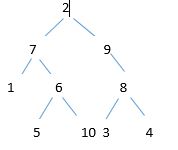
/*create tree for node (2,7),(2,9),(7,1),(7,6),(6,5),(6,10),(9,8),(8,3),(8,4)*/
A binary tree each node has at most two children generally referred as left child and right child from root node.
Components of Each node:
Pointer to left subtree
Pointer to right subtree
Data element
The topmost node in the tree is called the root. An empty tree is represented by NULL pointer.
A tree which has two nodes corresponding their parent node is known as binary tree.
Binary tree term as two types.
1) Full Binary tree.
A tree which has two nodes corresponding their parent node is known as full binary tree.
2) Complete Binary tree.
3) A tree which has left nodes corresponding their parent node is known as complete binary tree.
Common Terminologies of Binary Tree:
Root: Topmost node in a tree.
Parent: Every node (excluding a root) in a tree is connected by a directed edge from exactly one other node. This node is called a parent.
Child: A node directly connected to another node when moving away from the root.
Leaf/External node: Node with no children.
Internal node: Node with atleast one children.
Depth of a node: Number of edges from root to the node.
Height of a node: Number of edges from the node to the deepest leaf. Height of the tree is the height of the root.
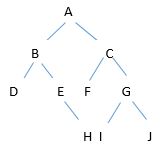
Binary Tree
In the binary tree root node is A. The tree has 10 nodes with 5 internal nodes A,B,C,E,G and 5 external nodes D,F,H,I,J. The height of the tree is 3. B is the parent of D and E while D and E are children of B.
C implementation Process:
1st need to create node struct where data, *left , *right declared;
2nd need to create new node function which take an item and return new node, where firstly need i) memory allocation same as datatype size.
If failed to memory allocation show error or assign data into new node,if left or right child no value then put them as NULL.
3rd to add child left and right need two function both take two input one for node pointer another for left or right child assigned.
4th create create_tree() function by create_node ,add_left_child() and right_child() function. This function return root.
5th main() function receive root data or value will print.
C Program For binary tree.
#include <stdio.h>
/*create a data type node */
typedef struct node Node;
struct node{
int data;
Node *left;
Node *right;
};
/*Create each node and corresponding child.Allocate memory for new node if new node empty. show error either keep item data variable,initialize left and right child into NULL then return new */
Node *create_node (int item)
{
Node *new_node = (Node *) malloc(sizeof(Node));
if(new_node == NULL)
{
printf(“Error ! Could not create an tree\n”);
exit(1);
}
new_node -> data = item;
new_node -> left= NULL;
new_node ->right =NULL;
return (new_node);
}
/*add left node corresponding parent node */